Staffinder Professional In/Out Board - Web User's Manual - Chapter 2

Index |  Chapter 1  |  Chapter 2  |  Chapter 3  |  Chapter 4

Staffinder Professional In/Out Board - Web User's Manual - Chapter 2

Chapter 2 - Staffinder Basic Functions

Navigating the application

Before we get into the details on how to use Staffinder we should first explain how to navigate within the application.  Staffinder Web is split into different areas consisting of the Banner, Personal Menu, Navigation Menus, and the Body.  Refer to figure 3.0.
  • The Banner never changes and is used to display your company name.
  • The Personal Menu is where you can quickly gain access to areas that pertain to yourself.  This is always visible no matter where you are in the application.  You can change your status, submit a vacation request, or log out.
  • The Menu Bar is used to navigate the areas of Staffinder.  There are 2 levels to the menu bar.  The top level is the general category and the second level is the sub categories.  For example... the Resource category will list all the configured resources in the second level.  Selecting one of the resources will display that resource in the body area.
  • The Body is where the various screens are displayed when selected in the menu.
Main Browser

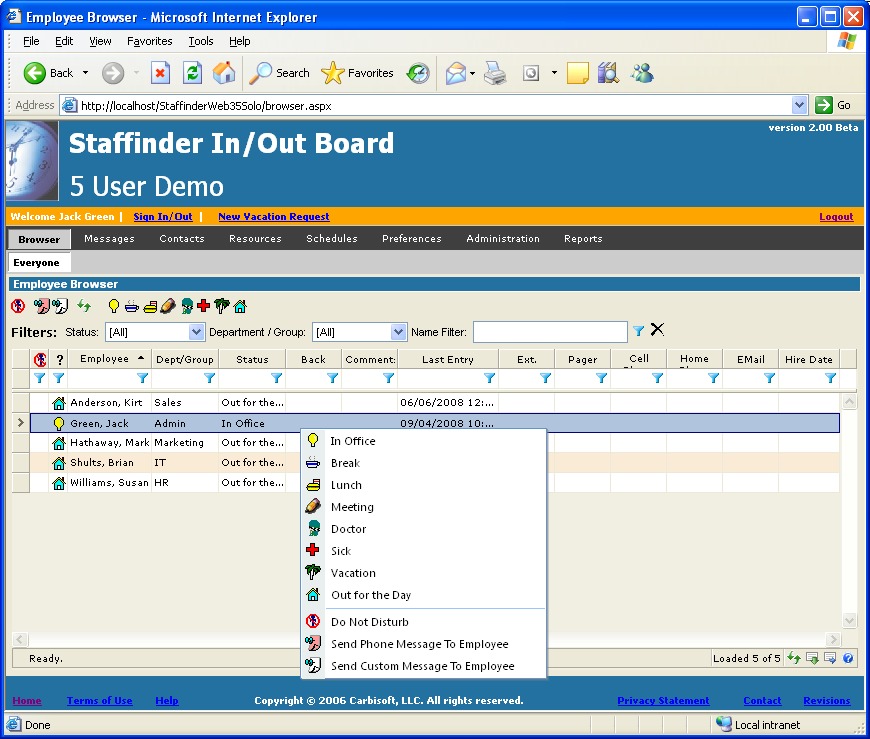
The Browser is where you will go to find the status of all your co-workers.  This screen will show you where everyone is and any comments they have left.  There are several different views to aid you in finding the specific person your interested in.  The browser menu contains 2 different view options.  One is the Everyone view which basically shows the entire company.  The second is the My Group view which is a custom group that you can assign specific individuals that your interested in and create a sort of favorites list.  You can assign individuals to this list in the preference section.  Below is a view of the Browser in the Everyone view.

Status Toolbar:

  • Do Not Disturb - This icon toggles the Do Not Disturb flag for the selected user.  This icon is displayed as the first column in the browser.

  • The pink and white Note Pad icons are for sending a phone message or custom message to the selected employee.  This will show up in their message box.

  • The Refresh Icon is so you can quickly refresh the display to get accurate information.  You can also set an auto refresh interval in the preferences section.

  • The remaining icons represent the standard and the custom defined status options.

All these options are also available via the right click menu. Simply right click on the employee you wish to change and you can easily get access to these functions.

Clicking any of the status icons will instantly change the status of the selected user.  If you need to add comments or back notes then use the Status Details screen by double-clicking on the employee.
 

Filters:

  1. Status:  This will filter the browser display based on the users status.

  2. Department/Group:  This will filter the browser display based on the department each user is assigned or the custom group.

  3. Name Filter:  This will search all employees for any matching criteria you enter.  This search uses the * (asterisk) wildcard searching ability as described below.

  • B* = Any person who's name begins with a "B"

  • *B = Any person who's name ends with a "B"

  • *B* = Any person who's name contains a "B"

If you don't enter an Asterisk it will automatically add one at the beginning and end of the search criteria.

Note:  If you wish to filter on a different row you can right-click any column header and select the "Filter Bar" menu item.  This will display the filter row just below the column headers.  You can enter any criteria in the column you wish to search and then click the blue filter icon in the right side of the cell and select "Apply all filters".  Only the rows matching the search parameters will be displayed.  You can enter criteria in multiple columns if you wish.  To remove the filter simply click the icon again and choose "Clear this filter" or "Clear all Filters" to remove them all.

Columns:

  • You can change the appearance of the display in several ways. By right clicking on any column header you have access to several options including Hiding columns you may not be concerned about.  This is done via the "Select Columns" context menu.  If you hide a column you will need to select the "Apply Changes" at the bottom of the menu in order for it to save your changes.

  • You also have the ability to resize any column by hovering the mouse over the area between the headers.  You will need to turn off the "Auto Size" feature in the preferences section before this will be available.  The grid defaults into an auto size mode and will try to fit everything into the screen that it can.  This can cause the screen to get pretty cramped if you have a small resolution monitor.  By turning off the auto size feature this will create a horizontal scroll bar and allow you to size the columns as much as you want.  These changes will be retained even if you close your browser.

  • Clicking on any header will perform a sort on that column.  Clicking again with reverse the sort into a descending order.  Clicking a third time will remove the sort.

  • The "Filter Bar" menu option will display a filter row just below the headers and allow you to search any column for anything you want.  This uses the same logic as the name filter in the Filter section above.


Figure 3.0

Changing your In/Out Status

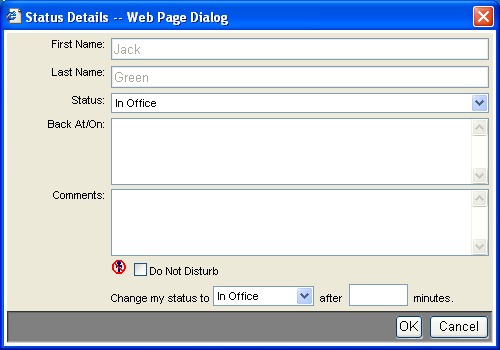
Using Staffinder, you should change your In/Out status when leaving your desk area for lunch, breaks, meetings, leaving for the day, etc.  By changing your status, you are making your location available to the other Staffinder users.  This can save them time looking for you or trying to contact you via pager or cell phone.

We have provided numerous ways to keep your status up to date.  First, we have provided 8 In/Out choices that are common from office to office.  These are In Office, Break, Lunch, Out for the Day, Meeting, Dr. Appt., Sick and Vacation.  Using the Setup utility (with Administrative rights), you can customize Staffinder with new In/Out choices as needed by your company.

The Sign In/Out screen (figure 3.1) is where you change your status or to provide back at or comments.  The other methods are intended to be quick access and do not allow back and comments to be added.  The quick status methods are done by using the status toolbar or the right-click popup menu from within the grid.  The sign in screen can be quickly accessed by double-clicking a person in the browser grid.  These methods are only available from within the browser screens
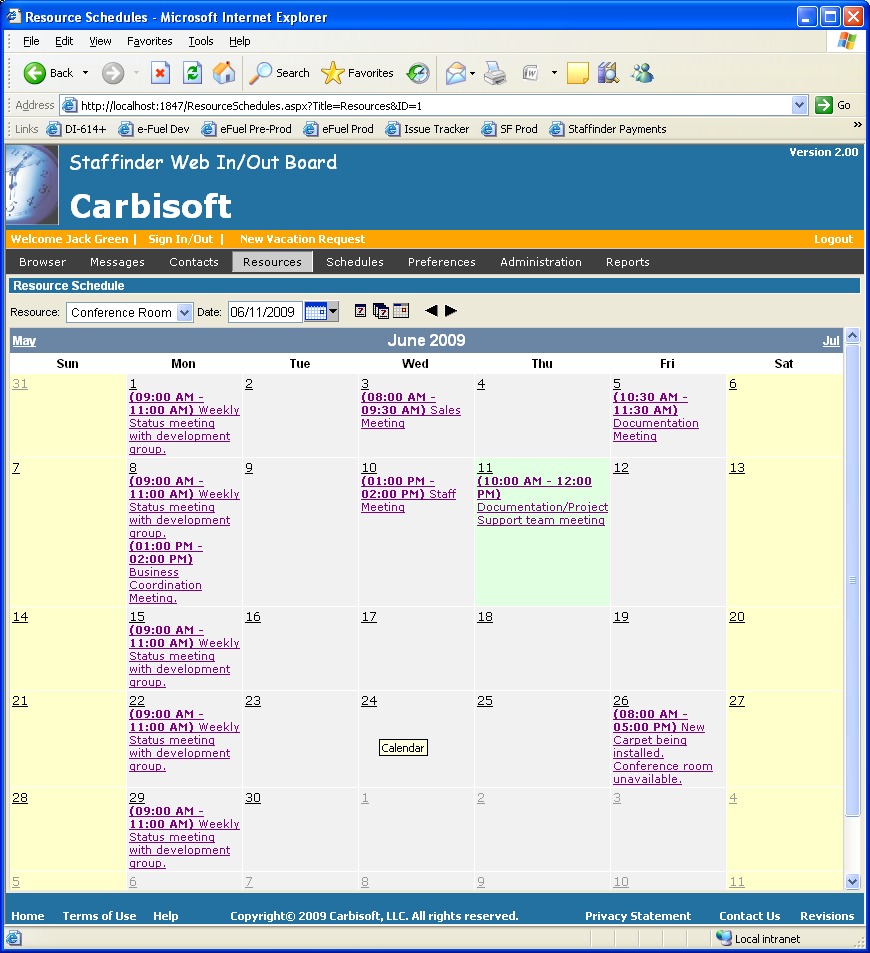
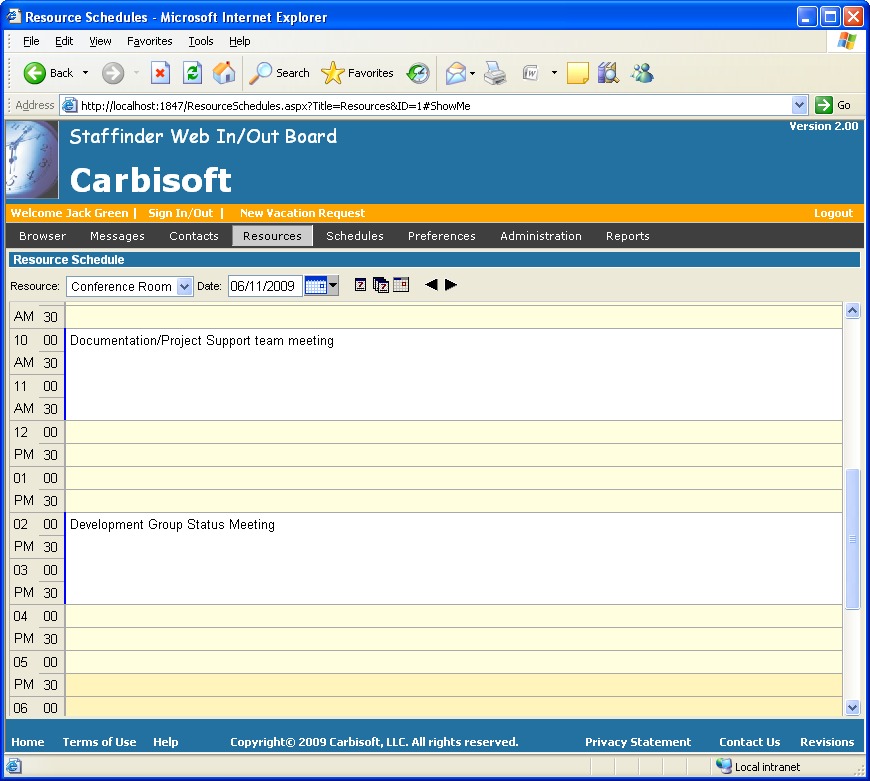
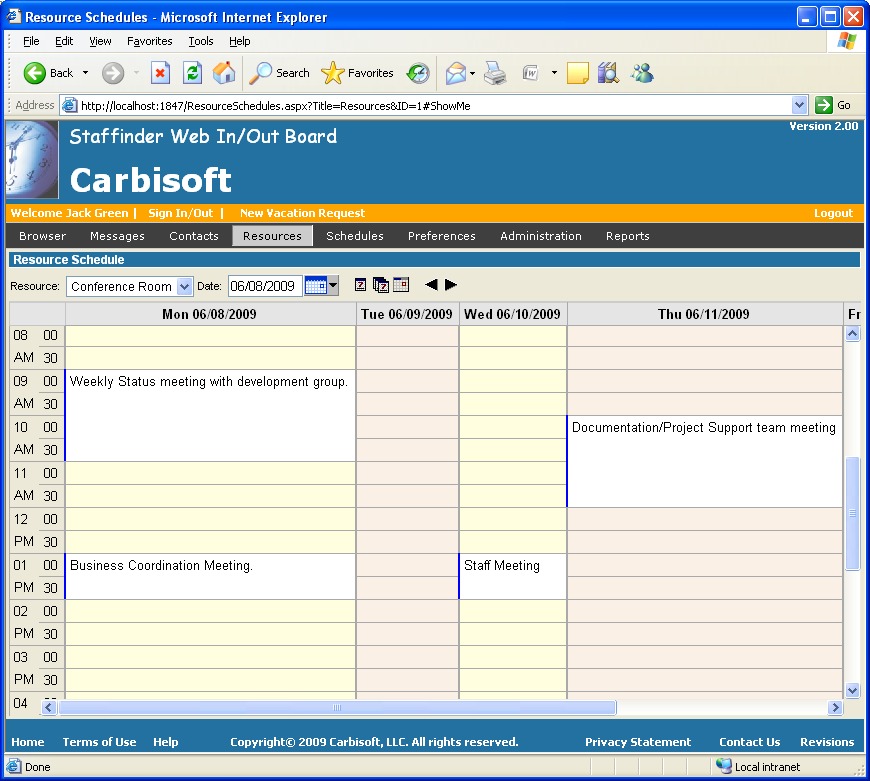

Figure 3.1

The Sign In/Out Screen options:

Status: This list contains all standard and custom In/Out choices.

Back At/On:  This box allows the user to let other staff know when they will return.  This box was designed with flexibility in mind, allowing entries like "3:40PM", "10/25/01", "Thursday", etc.

Comments:  If you would like to offer a note to other employees about your whereabouts, simply enter the text in the comments box.

Set "Do Not Disturb Flag":  Check this box if you would like the Do Not Disturb flag set.

Resource Scheduler

Resource Scheduler:
Staffinder has the ability to track time for various resources around your office.  This can be a conference room, a company vehicle, a video projector, or anything else that your employees may need to check out or book time against.

Viewing Resources: To view a resource simply select it in the navigation menu under the Resources Menu.  You will see the resource in with complete breakdown of the times throughout the day.  There are two different views you can use.  The month view (Figure 3.3) shows a general view of the events for an entire month.  You will not be able to see all the events for a given day but you will be able to see what days have events.  A short description of the event will be visible in each day.  Simply double-click any day and you will be taken to the daily view (Figure 3.4) where you will be able to enter events for that day.  You can toggle between the day, week, and month view by clicking the view buttons (Figure 3.2).  When you are in the month view you can navigate from month to month with the arrow buttons (Figure 3.2) next to the view buttons.  When in day view the arrow buttons will move one day at a time.


Figure 3.2


Figure 3.3


Figure 3.4


Figure 3.5

Adding an Event:

  1. Double-click the time slot that you want the event to start at.

  2. You will be shown the Resource schedule details screen (figure 3.5).  Here you can enter the start and stop times for the event along with the description of the event.  Click OK to add the event.

Modifying an Event:

  1. Double-click the event you wish to change.

  2. You will be shown the Resource schedule details screen (figure 3.5).  Here you can change the start and stop times for the event along with the description of the event.  Click OK to save the event.

Deleting an Event:

  1. Double-click the event you wish to delete.

  2. You will be shown the Resource schedule details screen (figure 3.6).  At the bottom of the details screen click the Delete button.  Click OK when prompted with the confirmation dialog box.

Recurring Schedules:
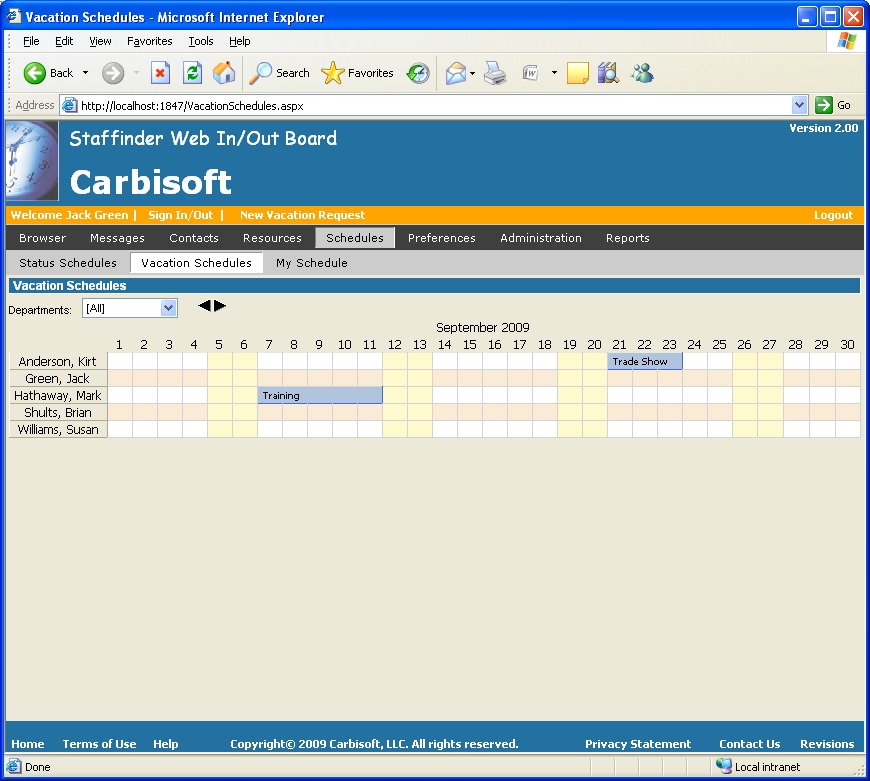
  1. Recurring schedules are explained in detail later in this chapter.


Figure 3.6

Vacation Schedules

Vacation Scheduler:
Staffinder comes with a vacation scheduler so you can keep track of time off for your employees.  This is an easy to use graphical display that you can quickly get a visual indicator of who will be gone.  Refer to figure 3.7 for the vacation scheduler main screen.  You can double-click directly on the vacation scheduler on the date desired and the schedule Details screen will appear.

Also built into Staffinder is the vacation request process.  This is an effective way to track your requests and also to approve or disapprove the requests.  You can assign who is responsible for the requests in the setup screen under the employee section.  Only people whom are designated as vacation managers will be able to receive requests.

Vacation Request Process:  The person requesting time off will submit a request and assign it to the person responsible for managing vacations.  The person whom received the request will receive a message in their Vacation Requests In-Box located in the Messages menu group.  
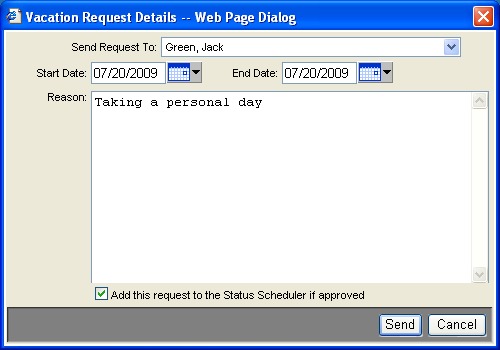
Refer to figure 3.8 for the vacation request form.  The person receiving the request will have the option of approving the request or not (figure 3.9).  When the request has been approved or disapproved a message will be sent back to the requestor indicating what action has been taken.

Adding a schedule:
To add a schedule you simply double click on the date for the person you wish to assign.  The details screen will appear where you can specify the start and end dates and also a reason.

Modifying a schedule:
To modify a schedule simply click on the schedule in the vacation scheduler main screen and the details screen will appear.  Make the necessary changes and click Ok.

Deleting a schedule:
click on the schedule you wish to delete to open the details screen for that event.  Click the Delete button at the bottom and confirm the deletion.


figure 3.7

This is a view of the request screen that the user will fill out when they need to take time off.  They will have the option of who to send the request to.


figure 3.8

This is a view of the request that the authorizing person will receive.  If you have been designated as a vacation administrator in the setup screen you will have a new item in the Messages group in the navigation bar called "Vacation Requests".  This list will contain all the request that you have received.  Once you approve or disapprove the request it will be removed from your list and a message with the results of your decision will be sent to the person.


figure 3.9

Personal Schedules

Personal Scheduler:
Staffinder has a Personal scheduler so you can keep track of your daily activities.  This is essentially the same as the resource scheduler only it applies to you and only you.  All the functions, features, and display options are the same as the resource scheduler.  See the Resource Scheduler functions on how to maintain your schedule.

Security:  You also have the ability to allow others to view your schedule and also make changes to your schedule.  This is done in the preferences section (chapter 3).
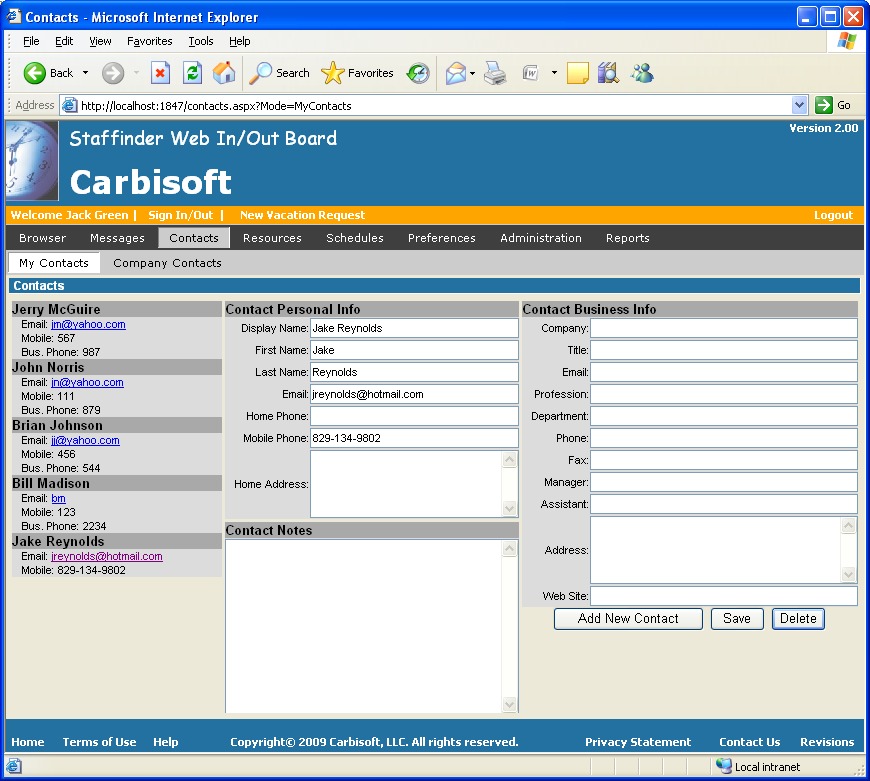
Contacts

Contact Management:
Staffinder has the ability to manage your contact information.  We have provided the ability to maintain personal as well as public Company Contacts.   Company Contacts are those that are shared among all employees and are visible to everyone.  "My Contacts" are those that only you have access to.


figure 3.10

Index |  Chapter 1  |  Chapter 2  |  Chapter 3  |  Chapter 4


User Manuals