Staffinder Professional In/Out Board - User's Manual - Chapter 2

Index  |  Chapter 1  |  Chapter 2  |  Chapter 3  |  Chapter 4  |  Chapter 5  |  Chapter 6

Chapter 2 - Personalizing Staffinder

Setting Basic Preferences
The Preference screens allow you to personalize Staffinder to work the way you want it too.  Some modifications are specific to your account (like break and lunch times) while others affect everyone who uses your computer (like "Prompt for user name at startup").  If you share a computer with other employees, you may have to agree on the most amicable settings for all users.

Preferences are broken down into five (5) screens, they are detailed below:

User Settings:
This screen contains many setting that determine how Staffinder starts up and shuts down.  Below is an explanation of these settings:


Figure 2.0

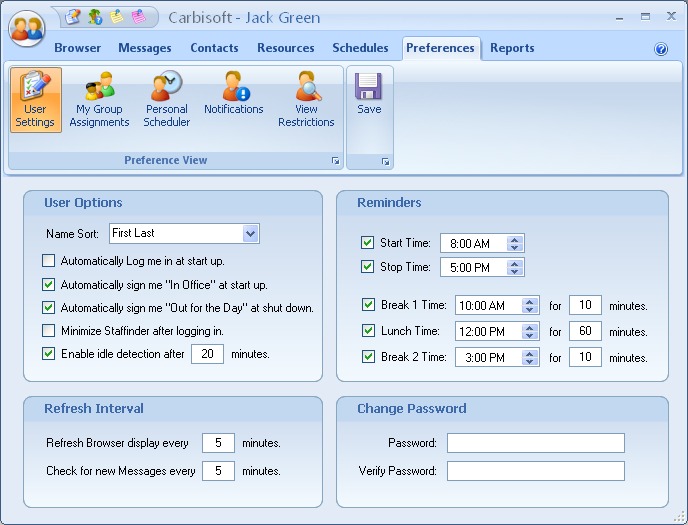
Name Sort:  This setting determines the way peoples names are displayed in Staffinder.  You have the choice of either First/Last or Last/First.

Automatically Log me in at Startup:  When this selection is selected, Staffinder will show the log in screen when the program starts.  This is a good option if you share your computer with other users.  If this is not checked, it automatically logs in the last successfully logged on user.

Automatically sign me "In Office" at start up:  This option will automatically change your status to "In Office" when you log into Staffinder.  This option is best left on, as it keeps you from having to remember to sign In Office when the program starts.

Automatically sign me "Out for the Day" at shut down:  This option will automatically change your status to "Out for the Day" when Staffinder is closed.  This option is also best left on as it helps you keep your status up to date.

Disable Close button: When this option is selected and you click the 'X' button to shut down Staffinder it will minimize and not shut down.  This is handy if you frequently close down Staffinder by mistake and wish to leave it running during the day.

Minimize Staffinder After Logging In:  When this option is selected, Staffinder will automatically move to a minimized condition.  You can double-click the icon in the system tray to maximize Staffinder again.

Enable Idle Workstation Detection After [ x ] Minutes:
When this option is selected, Staffinder will monitor your keyboard and mouse for activity.  If no activity is detected in the time selected in X (minutes), your status will be automatically changed to "Unknown - Status Automatically Changed by System".  Once Staffinder detects any keyboard or mouse input, your status will automatically be changed back to "In Office".

Refresh Browser display every X minutes:  This setting determines how often Staffinder will refresh the browser. This is an important setting for receptionists so the display is up to date

Check for new Messages every X minutes:  This setting determines how often Staffinder will check for new messages. If you turn this feature off you will not be notified of new messages when they arrive.

Start Time/Stop Time:  These times represent the working hours for each employee.

Break/Lunch Times:  These times represent the scheduled time for each break and lunch.  You also specify the duration of each.  This plays a major part when signing in and out.  When you sign in or out for a break or lunch Staffinder will automatically enter a Back At time equaling the current time plus the duration of the event.

Password/Verify Password:

This is how you change your password for each individual. You must enter both and they must match before the password will be changed.

My Group Assignments:
This screen allows you to assign individuals to your "My Group". This is a special built in group within Staffinder that you can use for various filtering and sorting.  Simply place a checkmark next to the individuals you wish to include in your group and then click the save button in the toolbar.


Figure 2.1

Personal Scheduler:
This screen allows you to assign individuals to your "My Group". This is a special built in group within Staffinder that you can use for various filtering and sorting.


Figure 2.2

Time Increment:  This setting determines the personal scheduler time increment.

Allow Overlaps:  This setting will allow or prevent overlapping events in the scheduler.

Security:  You can allow others to view your personal scheduler or even add events to it.  This is done through the security settings on this page.  To allow an individual to view your schedule simply move their name to the list on the right.  To allow an individual to make changes to your schedule you must check the box next to their name.  Make sure you click the save button when everything is done.

Notifications:
This screen allows you to setup status notifications so your notified when someone changes their status.  This is helpful if you want to be notified when someone returns to the office or returns from a meeting.  In order for you to be notified you must enter your email address.  You can enter multiple addresses by separating them with a semi-colon.


Figure 2.3

View Restrictions:
This screen allows you to Hide yourself from others so your activity is not visible to others. To hide yourself you simply enable the View Restriction.  If you wish to allow certain individuals to view your activity you can check their name in the list.  Click the save button when your done.


Figure 2.4

Security Settings

Staffinder contains settings that allow each employee to change which employees, if any, can manipulate their In/Out status or set their Do Not Disturb flag.  If the Staffinder administrators have granted this right, employees can make changes as needed using the Security screen (Figure 2.5).  Buttons and selections on the Tool and Menu bars will be grayed-out if administrators have locked this feature.


Figure 2.5

Changing Your Security Settings:
First, this screen requires you to enter your Staffinder username and password before any changes can be made to the screen controls.  If you'd like to change your password, click the Change button and follow the screens that appear.  Once you have successfully entered your username and password, you may adjust the following controls:

Security Disabled:  Click this option if you want to allow any employees to change your status from their desks.

Security Enabled:  By selecting this option, you make the choices below it available.

Receptionists can change my status:  This allows persons with Receptionist status to change your status from their desk.

My manager can change my status:  This allows the person assigned as your manager to change your status from their desk.

Employees in my department can change my status:  This allows all employees in your department to change your status.

Custom Security:  Checking this box allows the user to specify specific employees who have the ability to change their In/Out status.  Check the box next to the individuals you wish to grant permission to change your status.


Index  |  Chapter 1  |  Chapter 2  |  Chapter 3  |  Chapter 4  |  Chapter 5  |  Chapter 6


User Manuals