|
Index |
Chapter 1 |
Chapter 2 |
Chapter 3 |
Chapter 4 |
Chapter 5 |
Chapter 6
Chapter 3 - Staffinder Basic Functions
|
Changing your In/Out Status |
Using Staffinder, you should change your In/Out status when leaving your
desk area for lunch, breaks, meetings, leaving for the day, etc.
By changing your status, you are making your location available to the
other Staffinder users. This can save them time looking for you or
trying to contact you via pager or cell phone.
We have provided numerous ways to keep
your status up to date. First, we have provided 8 In/Out choices
that are common from office to office. These are In Office, Break,
Lunch, Out for the Day, Meeting, Dr. Appt., Sick and Vacation. Using
the Setup utility (with Administrative rights), you can customize Staffinder
with new In/Out choices as needed by your company.
If you wish to enter Back and Comments you must use
the Sign In/Out screen. The other methods are intended to be
quick and simple.
Here are the different ways your In/Out
status can be changed...
Preference Options:
Configured on the Options tab in Preferences, Staffinder can
be configured (by each user) to automatically change your status when
the program is started, stopped or when your PC in inactive for a
period of time.
Reminders:
Configured within Preferences, Reminders can be set to pop up onto
the screen to alert you to sign IN OFFICE, take a BREAK, eat LUNCH or
sign OUT FOR THE DAY. At the time you specify for each reminder,
Staffinder will show a pop-up window that allows you to either change
your status, dismiss the reminder or postpone the reminder. Setting
Reminders is discussed in Chapter 2 of
this manual.
Right-Clicking on a User or Double-Clicking on a user in the
browser:
Right-clicking on any user will instantly launch a pop-up that contains
the standard 8 In/Out choices that ship with Staffinder. Clicking
one of the choices will change the status of the user that was clicked
upon. If the selected user has not granted you rights to
change their status, the choices on the pop-up will be inactive.
Selecting a status instantly changes the In/Out status without further
prompts or dialog boxes.
Right-Clicking the Staffinder Tray
Icon:
Right-clicking the Tray Icon (down by the Windows clock) will launch
a pop-up that contains the standard 8 In/Out choices and also the
custom defined options. Clicking
a status in this pop-up will effect the currently logged in user only.
The choices on this list should always be available and provide a very
quick status change that does not require the main screen to be opened
or viewed.
Using the Sign In/Out Screen:
The Sign In/Out screen contains all possible options for Sign In/Out.
It not only contains all standard and custom In/Out choices, but also
contains entry boxes for Back At time, Comments, Do Not Disturb and
custom Reminders and also the ability to schedule future changes. The Sign In/Out screen can be launched from many of
the options listed above and does have its own button on the toolbar.
By default the double click action on a user in the browser will
display the properties screen. However, in the preference
screen you can change the behavior of the double click and make the
Sign In/Out screen display when double-clicking the browser. Below is the Sign In/Out screen (Figure 3.0).
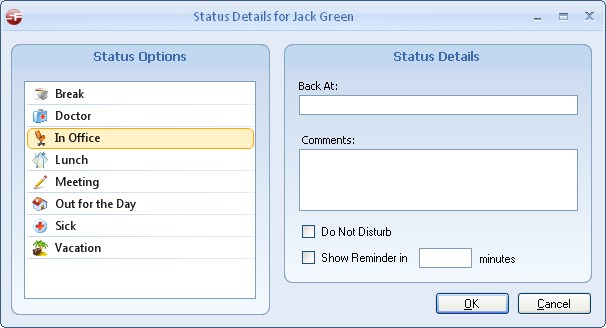
Figure 3.0
The Sign In/Out Screen
options:
In/Out Board Choices:
This list contains all standard and custom In/Out choices.
In this example, the choice "Whatever" is a custom choice with
a custom icon.
I'll be Back At/On:
This box allows the user to let other staff know when they will
return. This box was designed with flexibility in mind,
allowing entries like "3:40PM", "10/25/01", "Thursday", etc.
Comments: If
you would like to offer a note to other employees about your whereabouts,
simply enter the text in the comments box.
Set "Do Not Disturb
Flag": Check this box if you would like the Do Not Disturb
flag set.
Show Reminder in
X time: Staffinder allows the user to set a custom Reminder
after a specified amount of time. If you would like Staffinder
to remind you to change your status after a certain time, check
the "Show Reminder in" box and set the delay time.
Schedule Status
will display the scheduler screen and allow you to enter
status changes that need to occur in the future. This
will only be available if you have installed the Status
Scheduler Add-In Utility.
|
Keeping Your Status Up To Date |
Staffinder is a program that
requires the information within it to be accurate in order for the business
to receive the full benefit. When you first start using Staffinder,
your status may drift between accurate and inaccurate as you learn the
program. In general, most employees just get up and start walking
to their destination. Remembering to stop and change your status
requires memory, habit forming, realization that this improves business
productivity and a commitment to keep your status up-to-date. Many
companies have even offered incentives to employees who have made
an effort to keep their status accurate.
Realizing that accuracy is
critical, Staffinder contains built-in features and tools that help you
keep your status in check. Below is an explanation of these features:
Reminders:
Reminders can pop up at different times during the day to remind you
to sign In Office, Break, Lunch and Out for the Day. These can
be customized to fit your individual schedule. See
Chapter 2 of this manual to learn how
to configure the Reminders in the Preferences Dialog. Below is an example of how they appear
on the screen (figure 3.1).
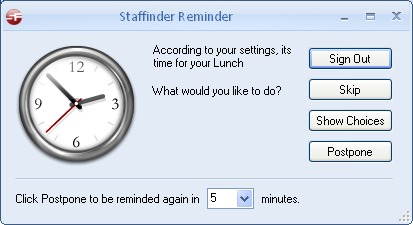
Figure 3.1
Custom In/Out Choice
Reminder: On the Sign In/Out screen is a selection to activate
a custom Reminder. This reminder will appear on the screen after
a period of time specified on the screen. See above for details
on the Sign In/Out screen. Below is an example of a custom Reminder
as it appear on the screen (Figure 3.2):
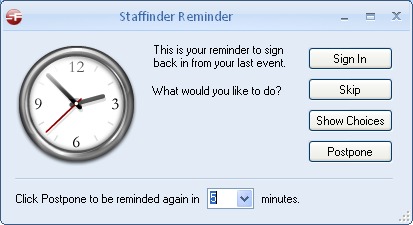
Figure 3.2
Auto Sign In when Staffinder
starts: Staffinder can be configured (in
Preferences) to sign you "In Office" when
the program is started. We strongly recommend enabling this feature
in Preferences.
Auto Sign Out when Staffinder
closes: Staffinder can be configured (in
Preferences) to sign you "Out for the
Day" when the program is closed.
Idle Workstation Detection:
Also in Preferences (see Chapter 2),
Staffinder can be set to detect when your PC has been inactive
for a specified amount of time and automatically change your status.
This can only occur if your status is set to "In Office".
Once Staffinder makes this change, your status will be set to "Unknown
- Status changed automatically by the system." Moving the
mouse or pressing a key on the keyboard will automatically change your
status back to "In Office".
|
Checking Employee Status / Viewing Employee
Properties |
Throughout the day you will
want to see the status of another employee. We have provided a number
of ways to get that information. Below are the different ways
to view Employee Status:
Using the Browser:
You can use the Staffinder browser to view the status of any employee.
The browser can show employee name, department,
status, back at time, comments, last entry and contact information.
If the column you are looking for is not available by scrolling right
or left, click View > Columns to enable the columns you want
to see. You can also click the employee to highlight the row,
making it easier to track the correct row as you scroll.
Employee Properties
Screen: The Employee properties screen will show status and
contact information on any employee. This screen can be brought
up by right-clicking on the employee and selecting "Properties" from
the pop-up menu or by double-clicking the employee. If double-clicking
shows the Sign In/Out screen instead, check the Options tab in Preferences
to change the "Show Sign In/Out on Double Click" setting. See
Chapter 2 for details on this setting.
The Employee Properties screen is shown below. (Figure 3.3).
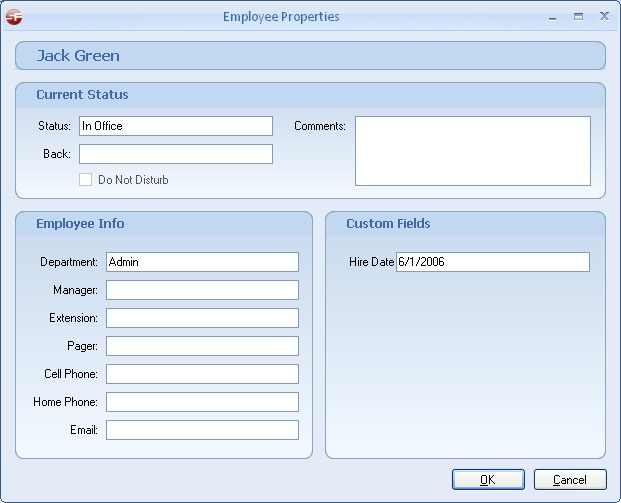
Figure 3.3
Viewing Resources: To view a resource simply select it in the
resource group. You will be shown a complete breakdown of the
times throughout the day. There are a number of different views you can use
via the View selection box. The month view (Figure 3.4) shows a
general view of the events for an entire month. You will not be
able to see all the events for a given day but you will be able to see
what days have events. A short description of the event will be
visible in each day.
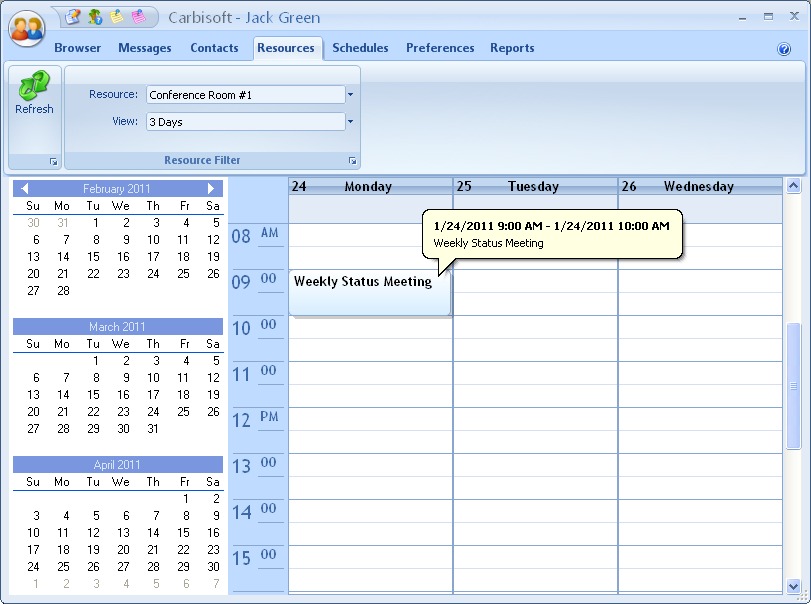
Figure 3.4
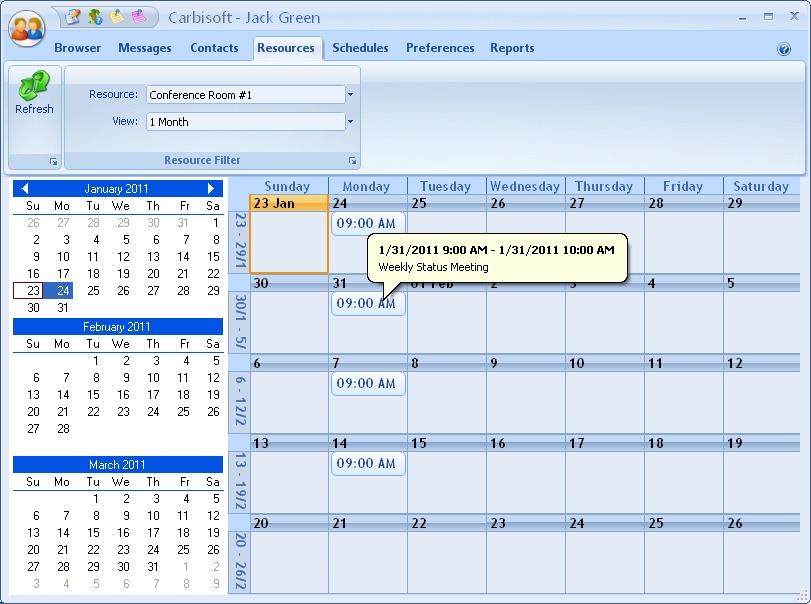
Figure 3.5
Adding an Event:
-
Double-click the time slot that you want the event to
start at.
-
You will be shown the event details screen. Here
you can enter the start and stop times for the event along with the
description of the event. Click OK to add the event.
-
If this event is a recurring event then click the
recurrence tab (figure
3.7) and assign the parameters of the event. Staffinder will
do the rest. If you need to change the parameters you can
simply open the event and change the parameters at any time. If you delete the recurrence it will remove all
instances of the event except for the initial day.
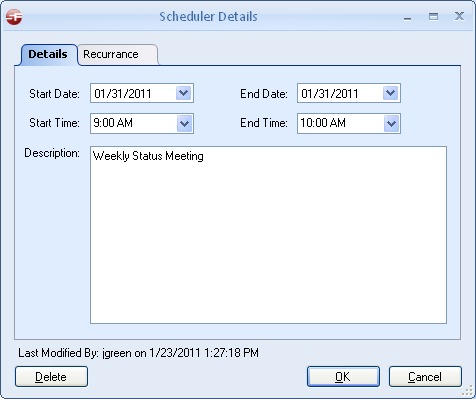
Figure 3.6
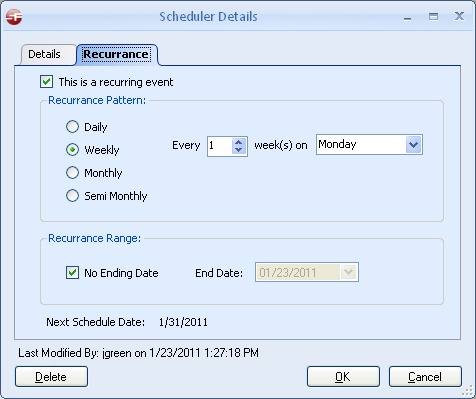
figure 3.7
Modifying an Event:
-
Double-click the event you wish to change.
-
You will be shown the event details screen. Here
you can change the start and stop times for the event along with the
description of the event. Click OK to save the event.
Deleting an Event:
There are 2 ways to delete an event. In either case
you will be prompted with a dialog to confirm your action.
-
You can double-click the event to view the details screen.
At the bottom left is the delete button. Click it to delete that
event.
-
Highlight the event and hit the delete key on the
keyboard or right-click on the event and choose the Delete menu
option.
|
Managing Vacation Schedules |
Vacation Schedules: Staffinder comes with a
vacation scheduler so you can keep track of time off for your
employees. This is an easy to use graphical display that you can
quickly get a visual indicator of who will be gone. Refer to
figure 3.8 for the vacation scheduler main screen.
Double-clicking on an event or on a vacant time slot will display the
Vacation Scheduler Details dialog shown in figure 3.9.
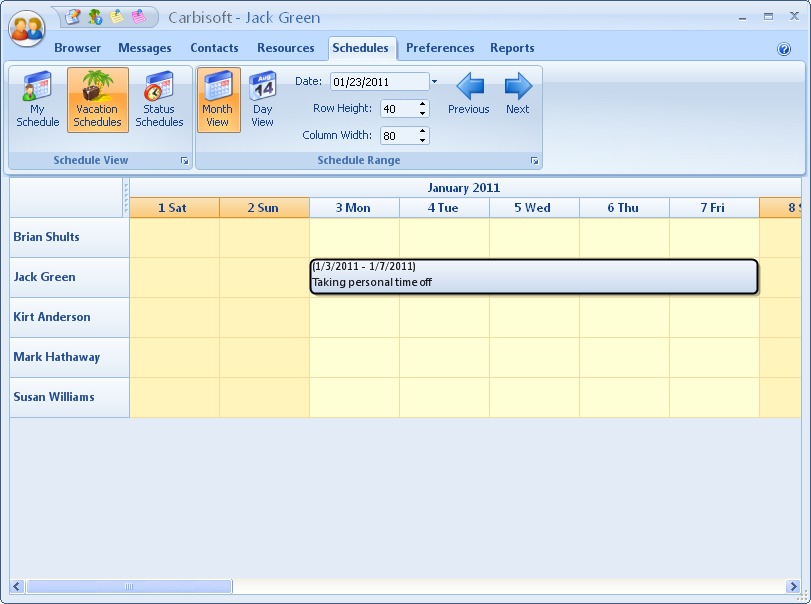
figure 3.8
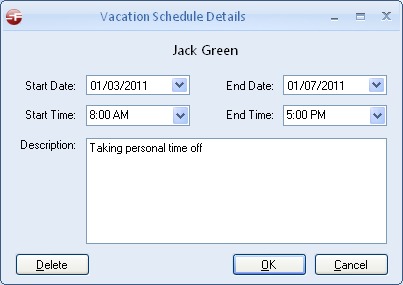
figure 3.9
Also built into Staffinder is the Vacation Request Process. This is
an effective way to track your requests and also to approve or disapprove
the requests. You can assign who is responsible for the requests in
the setup screen under the employee section. The person requesting
time off will
receive a message when their request has been approved or disapproved.
Refer to figure 3.12 for the vacation request form. Once an
individual has submitted the request the person receiving the request
will have the option of approving the request or not (figure 3.13). If the
request is approved then a message will be sent to the requestor
letting them know it has been approved. If the request in not
approved then the person who is disapproving the request will be asked
if they want to send a message indicating why they are denying the
request. If they choose Yes then they will be shown a custom
message that they can fill out with the reason why the request is being
denied.
This is a view of the request screen that the user will
fill out when they need to take time off. They will have the option
of who to send the request to.
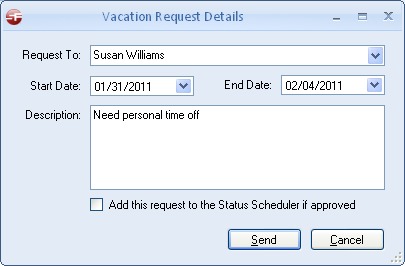
figure 3.10
This is a view of the request that the
authorizing person will receive. If you have been designated as a
vacation administrator in the setup screen you will have a new item in the
navigation bar called "Vacation Requests". This list will contain
all the request that you have received. Once you approve or
disapprove the request it will be removed from your list and a message with the results
of your decision will be sent to the person.
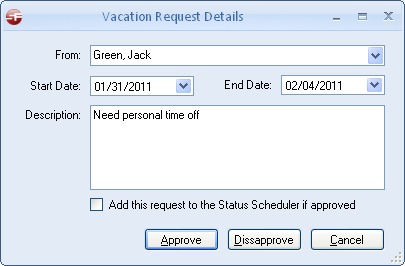
figure 3.11
Index |
Chapter 1 |
Chapter 2 |
Chapter 3 |
Chapter 4 |
Chapter 5 |
Chapter 6
|