|
Index |
Chapter 1 |
Chapter 2 |
Chapter 3 |
Chapter 4 |
Chapter 5 |
Chapter 6
Chapter 1 - Getting Started with Staffinder
Depending on how Staffinder was installed,
it may automatically start when your workstation is started. If Staffinder
needs to be started manually or you accidentally close it, here is how
to start Staffinder.
You can start Staffinder by clicking
Start > Programs > Staffinder. If you're using
Windows 98 or Windows 2000, you can quickly create a Shortcut
on your desktop by right-clicking the Staffinder entry and dragging it
to the desktop and releasing the mouse button. When the pop-up menu
appears, select Copy Here.
If Staffinder does not start automatically
when your workstation is started, contact your system administrator to
make adjustments to your Windows Startup folder.
Depending on how Staffinder is configured,
you will either be taken directly to the Staffinder interface, Staffinder
will run minimized, or the log in screen will appear.
When you start Staffinder, you may be asked
to log in by providing your user name and password. Below
is the screen you will use to provide this information. (Figure 1.1)
To log into Staffinder:
-
If you have a large
number of employees in Staffinder, you may find it easier to locate
your name in the list by selecting your department from the Dept/Group
drop down list.
-
Click your name in the
Employees box.
-
Enter your password
in the yellow Password box. Your password
is set to your first name when your account is created.
It is case-sensitive, so if your name is "Betty", your password
is set to "Betty" by default. We recommend you change your
password after your first successful login, this will keep other
people from logging in under your account. To change your password,
click the Security icon on the toolbar or click Tools <
Security.
-
Click OK or press
Enter to log in.
Note:
If you are the only user who uses the computer, you may want Staffinder
to log you in automatically. To change this setting, click
View > Preferences. On the Options/Refresh tab, uncheck
the "Prompt for user name at startup"
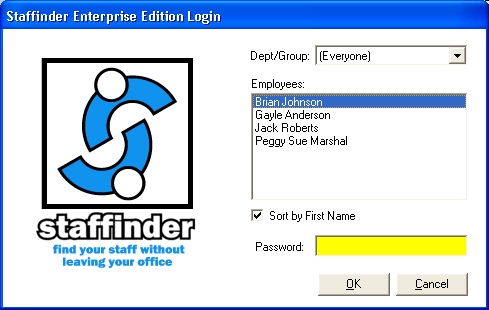
Figure 1.1
We believe that a program's interface should
help you use it. This concept means following the standards of other
popular programs that you are probably already using. In many cases,
we have made two or three ways to accomplish the same task. We also
activated the right mouse button whenever it made sense. Below is
the Staffinder main screen with explanations the describe the main parts
of the interface.
In general, Staffinder is an Explorer style
application. This means the main interface is divided into a Left
and Right pane. The left pane shows the Departments/Groups, My Group,
Messages, and Resources categories. The right side pane show employee
names, their In/Out status and message details when My Messages is selected
in the left pane.
Below is a description of each of the 6
sections shown in diagram 1.2 below:

Figure 1.2
Title Bar:
The Title bar contains the name of the application (Staffinder) followed
by the name of the currently logged on user. The right side of the
Title bar contain the standard Minimize, Maximize/Restore and Close buttons.
Menu Bar:
The Menu Bar contains drop down lists that contain program functions.
Here is a list of the functions in all Menu Bar selections:
File Dropdown:
Reports - Displays the reports dialog so you can print reports
Exit Staffinder - This selection closes Staffinder. If your preferences
are set accordingly, you may be prompted with choices before the program
closes.
View Dropdown:
First Name/Last Name: These selections allow the user to choose
how the "Employee" column will be sorted.
Search: This option allows the user to search the employee database
based on name, phone number or extension.
Preferences: Launches the Preferences screen (detailed later on
this page).
Status Schedules: Displays the status scheduler screen so you can
program in future status change. Requires the status scheduler
add-in to be installed. This is a free download available in
the download section of this web site.
Vacation Schedules: This menu option will display the Vacation
schedule screen so you can see who is on vacation or not.
Refresh: Forces an immediate Refresh of the screen.
Columns: Allows the user to select which columns are displayed in the
Right Pane.
Explorer Bar: Allows the user to turn on/off the Navigation
Bar
(Left Pane)
Status Dropdown:
In Office through Vacation: In one click, sets the selected
user to the status selected in the menu.
Custom: If you have configured any custom status option these
will be displayed in the sub menu.
Sign In/Out: Brings up the Sign In/Out screen, showing all possible
In/Out Choices as well as other related settings.
Do Not Disturb: Turns on/off the "Do not disturb flag" for the
selected employee (rights pending).
Notify me when in Office: Sets a flag on an employee. Brings
up a dialog box to show when the user signed back "In Office".
Send Phone Message to employee: Sends a "while your were out" message
to the selected employee.
Send Custom Message to employee: Displays the custom message
form for sending email type messages to other employees.
Send Email: Displays your default email message window so you
can send an email via your email system.
Submit Vacation Request: This will display the vacation
request form so you can request time off from your supervisor.
Properties: Brings up the properties (phone, extension, name,
status) for the currently selected employee.
Messages Dropdown:
New Phone Message: Sends a "while your were out" message to the
selected employee.
New Custom Message: Sends a custom message to the selected
employee.
Delete Message: Deletes the currently selected message.
Save Message: Allows you to save messages into your saved
message folder.
Reply: Allows you to reply to someone's message.
Tools Dropdown:
Change User: Allows the ability to log in as any user without
restarting the program. Brings up the Log In screen, shown above.
Security: If allowed from an administrative level, allows the
user to configure their security settings.
Change Password: Allows users to change their password.
Active Update: Displays the Active Update utility so you can
download any update to Staffinder easily.
Setup: Displays the Company setup screen where you can manage
the various areas of Staffinder.
Help Dropdown:
Staffinder on the Web: Brings up web-based help files,
including this User Manual, Installation, and troubleshooting.
About Staffinder: Brings up information about Staffinder so
you can find what version of staffinder you have.
Tool Bar:
The Staffinder Toolbar is divided into two sections, the standard buttons
and the In/Out choice buttons.
Standard Buttons:
The standard buttons are the same in every installation and cannot be
changed. ToolTips for each button will reveal the purpose of a
button by hovering the mouse over any button for a few moments.
Depending on the selecting employee or other settings, certain buttons
my become
grayed out", depicting that that particular function is not available
at that time. Below is a description of each button:

Figure 1.3
Button 1 - Hide/Unhide Company Navigation Bar:
This button toggles the left side pane that shows the departments,
Everyone, My Group, etc. This option is useful when operating
Staffinder in a kiosk mode or when more employee data needs to be
seen.
Button 2 - View by First Name:
This button toggles with button 3 to sort the users by First Name.
Button 3 - View by Last Name:
This button toggles with button 2 to sort the users by Last Name.
Button 4 - Reports:
This button brings up the report criteria screen where you can run
the various reports.
Button 5 - Search:
This button brings up a Search window that allows users to search
the entire employee database by most of the fields included in employee
information. This includes name and phone information.
Button 6 - View Employee Properties:
This button shows the Employee Properties for the selected employee.
Button 7 - View Preferences:
This button shows the Preferences dialog boxes that allow each user
to customize general settings, refresh rate, Reminders, font, font
color and My Group.
Button 8 - View Security Settings:
This button shows the Security dialog box where the user must provide
username and password to change security settings. Security
settings access can be locked by Staffinder administrators to prevent
users from making inappropriate selections.
Button 9 - Manual Screen Refresh:
This button forces an immediate refresh of the data in the employee
grid.
Button 10 - Create New Note to Employee:
This begins the process of sending a While You Were Out message to
the selected employee. In the example, the currently logged
in user is selected, causing the button to become unavailable.
Button 11 - Delete Note:
This button allows the user to delete the currently selected or viewed
note. In the example, no Note is selected, causing the button
to be unavailable.
Button 12 - Sets "Do Not Disturb" flag:
This button toggles the Do Not Disturb flag for the selected user.
This button will be unavailable if you do not have permission to
change the selected users In/Out status.
Button 13 - View Sign In/Out Screen:
This button shows the Sign In/Out screen.
In/Out Choice Buttons:
Staffinder ships with eight standard In/Out board options. These
cannot be removed from the system, but you can specify a new icon if
desired. Staffinder administrators can create new In/Out boar
selections, which will appear in position 9 and higher on the Tool Bar.
Below is a sample of a Tool Bar showing the eight standard selections
and a custom choice in positions number 9.
If these icons become unavailable (grayed out) when
selecting an employee, you currently do not have rights to change that
employees status. If you need the rights to change a persons status,
contact your Staffinder administrator.

Button 1 - In Office button (standard)
Button 2 - On Break button (standard)
Button 3 - At Lunch button (standard)
Button 4 - Out for the Day button (standard)
Button 5 - In Meeting button (standard)
Button 6 - Dr/Dentist Appt button (standard)
Button 7 - Sick button (standard)
Button 8 - On Vacation button (standard)
Button 9 - Custom In/Out Choice (custom). You will see
a button for each custom option you have added.
Left Pane (Explorer Bar):
The left pane is used to show the Organization Name, Browsers, all configured
Departments, Messages, and Resources. Buttons and selections on
the Menu Bar and Tool Bar allow the Explorer Bar to be turned on or off
as needed.
Right Pane (Employee Grid):
The right pane is where employees will spend most of their time.
The name, phone info and in/out status of each employee is shown in the
right pane. You can do quite a bit of customization to achieve
the results you like. By changing the sorting or the column order
you can have have the results organized in a manner that you like.
Below are the details on what can be done with the columns...
-
Can have their width
adjusted by clicking (and holding) the dividers between the column headers and dragging
the mouse left or right.
-
Can be moved to a different horizontal position by clicking on
a column header and dragging the header left or right to a new position.
-
can be sorted in ascending or descending orders by clicking
on the column header. An arrow will appear to show how the column
is being sorted. You can also sort by multiple columns at once
by holding down the CTRL key and selecting additional columns (up to
8). Your sort settings will also be saved when you exit
Staffinder.
-
Can be hidden or shown by clicking View > Columns on the Menu Bar.
Columns with a "check" by them will be shown.
Right-clicking an employee will show a pop-up menu with available
functions that can be used on the selected employee. This list
will vary depending on the employee selected and the rights you have
with that employee.
Double-clicking
an employee will either show the Employee Properties screen or the Sign
In/Out screen depending on how the "Show Sign In/Out on Double-Click"
option is set in the preference screen.
Index |
Chapter 1 |
Chapter 2 |
Chapter 3 |
Chapter 4 |
Chapter 5 |
Chapter 6
|