|
Index |
Chapter 1 |
Chapter 2 |
Chapter 3 |
Chapter 4 |
Chapter 5 |
Chapter 6
Chapter 2 - Configuring
Staffinder Settings
|
Setting
Basic Preferences |
The Preference screens allow you to
configure Staffinder to work in your personal work environment.
Some modifications are specific to your account (like break and lunch
times) while others affect everyone who uses your computer (like
"Ask for user name at startup"). If you share a
computer with other employees, you may have to agree on the most
amicable settings for all users.
The Preferences screens can be opened
in the following methods: Click View > Preferences on the Menu
Bar, clicking the Preferences button on the Tool Bar.
Preferences are broken down into five
(5) screens, they are detailed below:
Options Screen:
The Options screen (see Figure 2.0) contains many setting that
determine how Staffinder starts up and shuts down. Below is an
explanation of these settings:
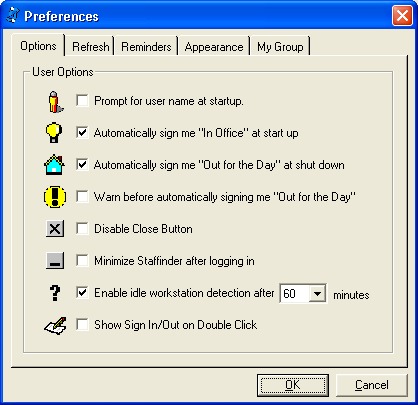
Figure 2.0
Prompt for user name at Startup:
When this selection is selected, Staffinder will show the log in
screen when the program starts. This is a good option if you
share your computer with other users. If this is not checked,
it automatically logs in the last successfully logged on user.
Automatically sign me "In
Office" at start up: This option will automatically
change your status to "In Office" when you log into
Staffinder. This option is best left on, as it keeps you from
having to remember to sign In Office when the program starts.
Automatically sign me "Out
for the Day" at shut down: This option will
automatically change your status to "Out for the Day" when
Staffinder is closed. This option is also best left on as it
helps you keep your status up to date.
Warn before automatically signing
me 'Out for the Day": This option works with the
option above it. If this option is selected, Staffinder will
pop up a screen telling you that your status is about to be changed
to "Out for the Day" because the program is closing.
Options on this screen will let you keep the same status if
needed. We recommend leaving this option selected.
Disable Close button: When
this option is selected and you click the 'X' button to shut down
Staffinder it will minimize and not shut down. This is handy
if you frequently close down staffinder by mistake and wish to leave
it running during the day.
Minimize Staffinder After Logging
In: When this option is selected, Staffinder will
automatically move to a minimized condition. You can
double-click the icon in the system tray to maximize staffinder
again.
Enable Idle Workstation Detection
After [ x ] Minutes:
When this option is selected, Staffinder will monitor your keyboard
and mouse for activity. If no activity is detected in the time
selected in X (minutes), your status will be automatically changed
to "Unknown - Status Automatically Changed by
System". Once Staffinder detects any keyboard or mouse
input, your status will automatically be changed back to "In
Office".
Show Sign In/Out on Double Click:
Staffinder gives each user the ability to choose what occurs when
they double-click a user name in the Employee Grid. If this
option is selected, double-clicking an employee brings up the Sign
In/Out" screen. Otherwise it shows the Employee
Properties screen
Refresh Screen:
The Refresh screen (Figure 2.1) contains
only one option. This option allows each user to determine a
Refresh interval for their PC. Some employees (like
receptionists) need this information updated automatically on a
frequent basis so they can relay the information to other employees or
customers. Normal employees may only need the information a few
times a day, where a manual refresh would most likely work. If
you are in a position where you are constantly accessing this
information throughout the day, you should choose a frequent refresh
time like 1 or 5 minutes. If you don't need the information very
frequently, choose 15 minutes or Never.
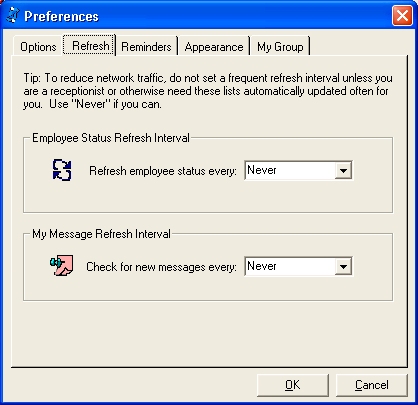
Figure 2.1
Reminders Screen:
Staffinder can alert you on when to start work, stop work, take a break
and take lunch. The Reminders screen (Figure 2.2) in Preferences
is where you configure these features. All reminders give you
three options when they appear. You can perform the action (like
Sign In or take a Break), you can skip it altogether, or you can
postpone the event and be reminded later. Below is the Reminder
configuration screen:
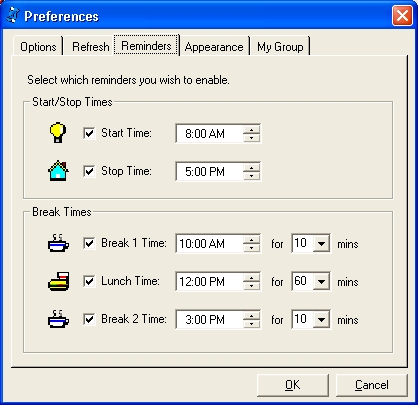
Figure 2.2
Reminder
Configuration:
Each Reminder contains at least two pieces of configuration
information. First, each one contains a checkbox. This
checkbox is used to enable or disable the reminder. A checked
Reminder is active and will start generating pop-up Reminders at the
time specified in the time box. Use the up/down arrows for
each reminder to specify the time of day you want the Reminder to
begin popping up messages.
Additionally,
selections in Break Times allow users to specify the typical length
of their breaks and lunch. These times (in minutes) will be
used to automatically determine what time the employee will
return. The return time will be inserted into the employee
Back At column.
Appearance Screen:
Staffinder, through the Appearance screen (Figure 2.3) allows each user
to configure certain cosmetic settings. The settings are
described below:
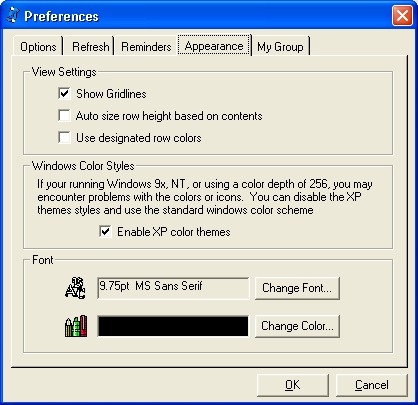
Figure 2.3
Show Gridlines: This
setting, when checked shows vertical and horizontal gridlines in the
Employee Grid.
Auto size row height based on
contents: When this option is selected, cell data that is
too long to be displayed in the current column width will wrap
inside the cell, causing the row to grow in height.
Windows Color Styles:
If
your running an older version of windows or using a low color depth
setting you will want to disable this feature. This can happen
in environments like Citrix or Terminal Server where your color
depth cannot exceed 256. In order versions of windows like 9x
or NT, you may encounter cases where the color cannot correctly
display or your icons appear distorted. By disabling this
feature Staffinder will display using the standard colors and turn
off the gradient effects.
Font Style:
If
you have a favorite font, or are having trouble reading the default
font, click the Change Font button and select a new font, font size,
bold, italics... whatever suits your needs.
Font Color:
Continue to customize you own look for Staffinder by selecting your
favorite font color.
My Group Screen:
Many times you might want to track the locations of employees in
different departments. Typically this would require finding the
employees in the Everyone view or selecting each department for the
employee(s) you want to view. My Group (Figure 2.4) was created
to allow each employee build a custom list of employee, regardless of
what Department they are in.
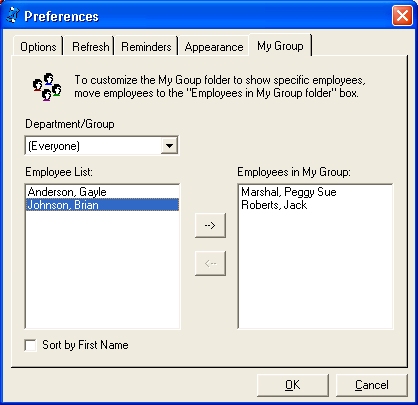
Figure 2.4
Building a Group:
Building a Group in Staffinder is easy. The process
is simply to move employees from the Employee List box (left side)
to the Employee in My Group box (right side). A drop down list
for Department is available to help you locate employees within your
organization.
Once you have created
your group, simply click My Group in the Company Tree (left side of
screen) to see only the employee you selected, regardless of their
department. You can work with employees in your group as you
normally would.
You can add and remove
people from your group as often as needed.
Staffinder contains
settings that allow each employee to change which employees, if any,
can manipulate their In/Out status or set their Do Not Disturb
flag. If the Staffinder administrators have granted this right,
employees can make changes as needed using the Security screen (Figure
2.5). Buttons and selections on the Tool and Menu bars will be
grayed-out if administrators have locked this feature.
Figure 2.5
Changing Your
Security Settings:
First, this screen requires you to enter your Staffinder
username and password before any changes can be made to the screen
controls. If you'd like to change your password, click the
Change button and follow the screens that appear. Once you
have successfully entered your username and password, you may adjust
the following controls:
Security
Disabled: Click this option if you want to allow any
employees to change your status from their desks.
Security Enabled:
By selecting this option, you make the choices below it
available.
Employees
cannot change my status: Select this option if you
would like no other employees to be able to change your status
from their desk.
Receptionists
can change my status: This allows persons with
Receptionist status to change your status from their desk.
My manager can
change my status: This allows the person assigned as
your manager to change your status from their desk.
Employees in
my department can change my status: This allows all
employees in your department to change your status.
Custom
Security: Clicking the Settings button allows the
user to specify other employees who need the ability to change
their In/Out status. The following screen (Figure 2.6)
is used to selected the individual employee(s).
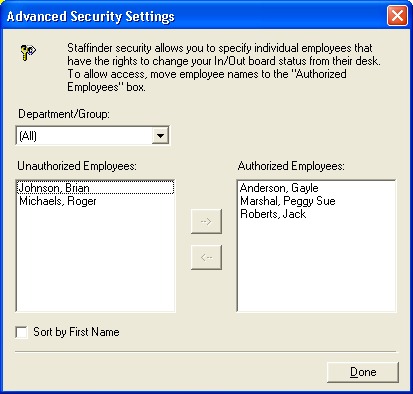
Figure 2.6
Index |
Chapter 1 |
Chapter 2 |
Chapter 3 |
Chapter 4 |
Chapter 5 |
Chapter 6 |